How to Paint Kitchen Cabinets: Your Step-By-Step Guide
The kitchen is in the heart of every home – a space filled with memories, aromas, and lively conversations. Over time, wear and tear and evolving interior trends can make even the most cherished kitchen appear dated. And while a full renovation might be the dream for many, the costs and efforts can sometimes be prohibitive. This is where the importance of refreshing your kitchen comes into play.
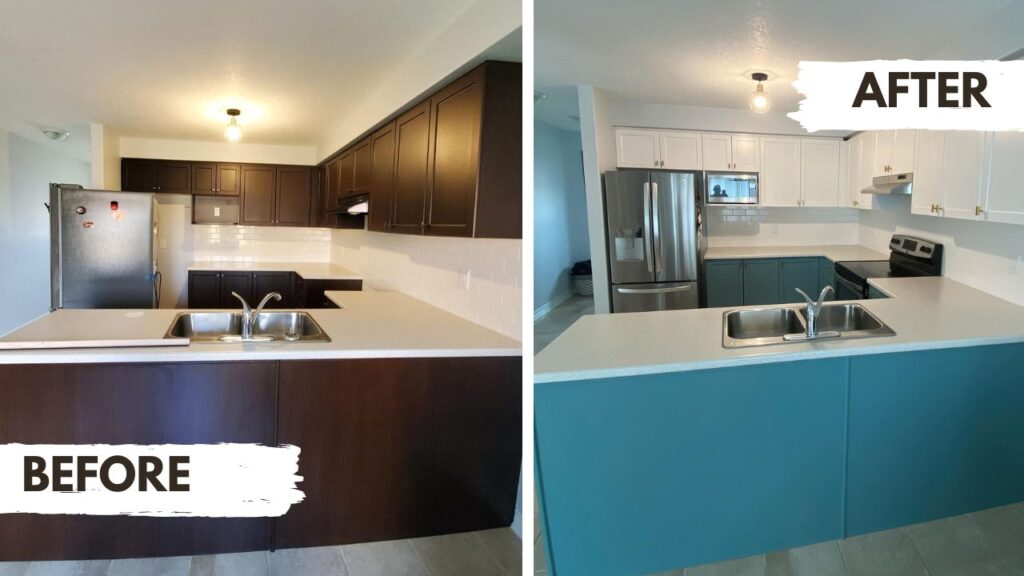
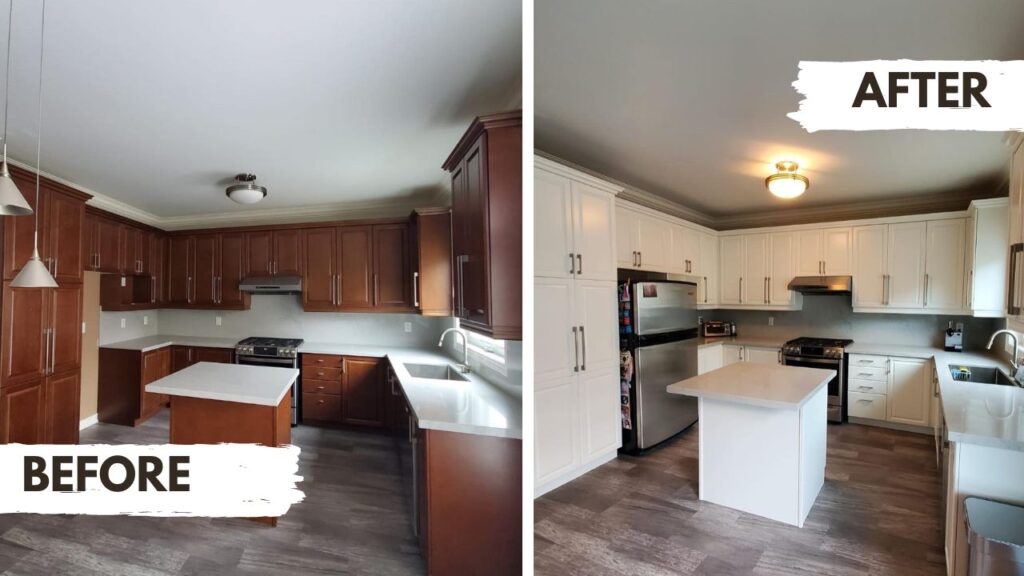
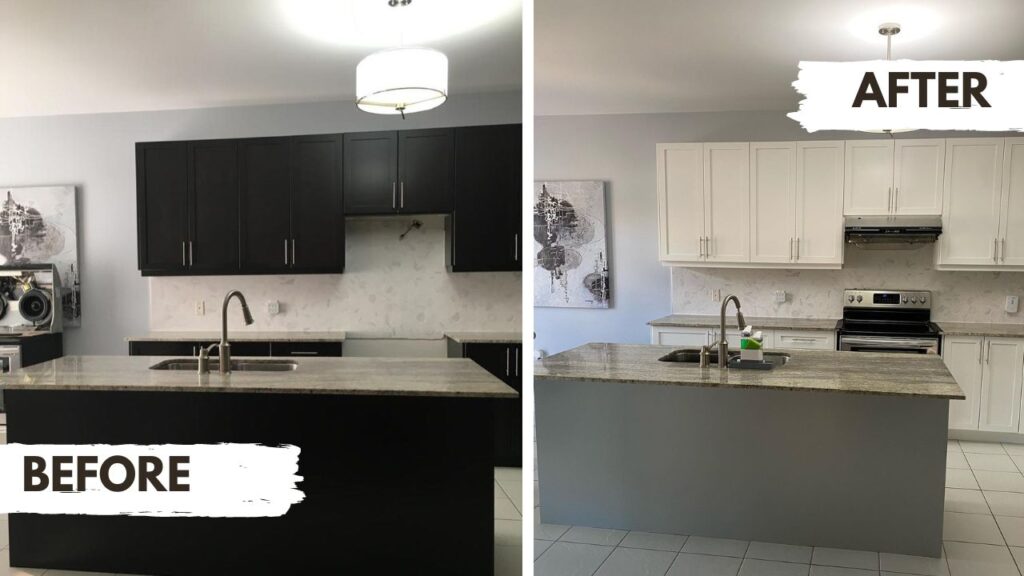
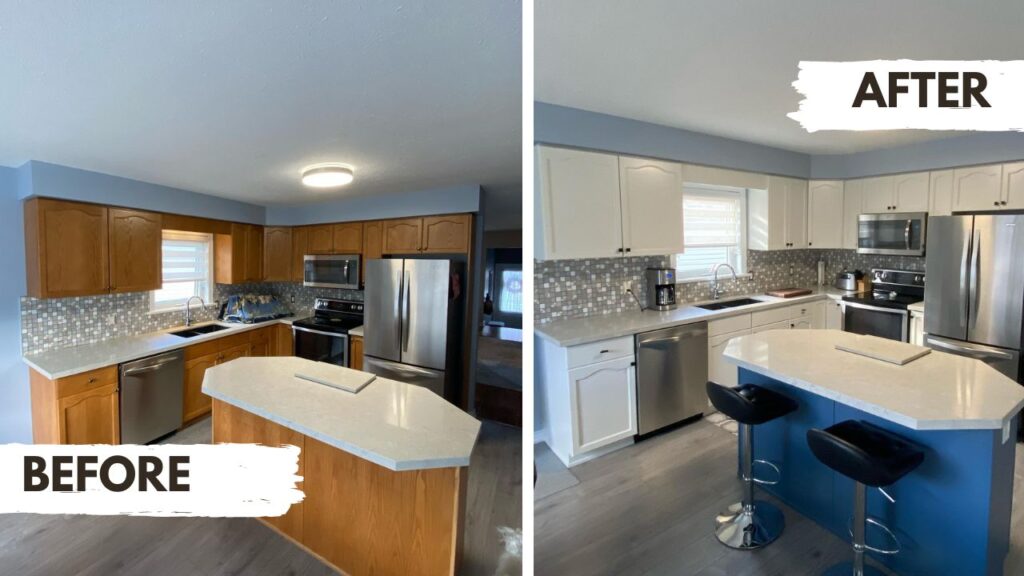
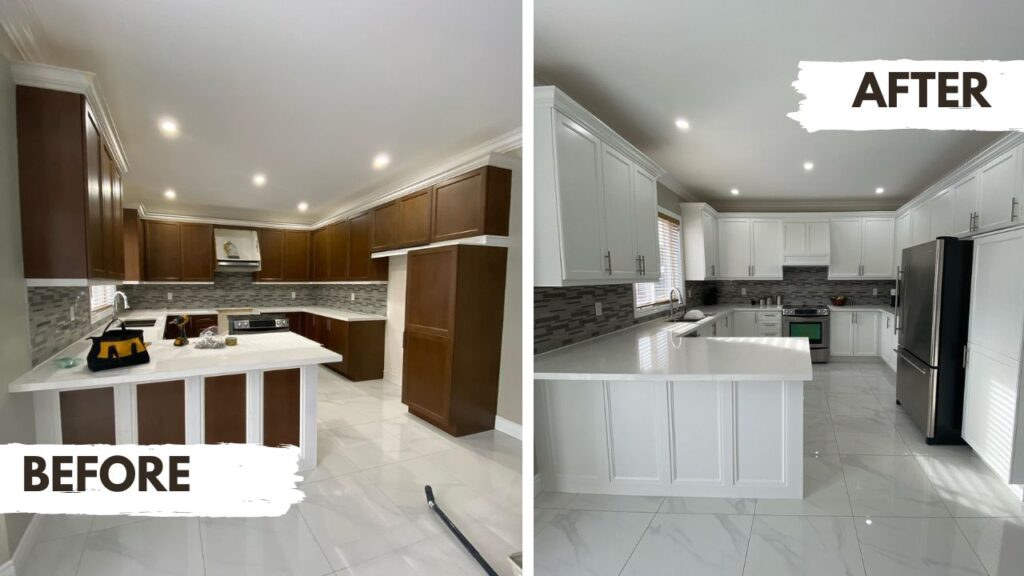
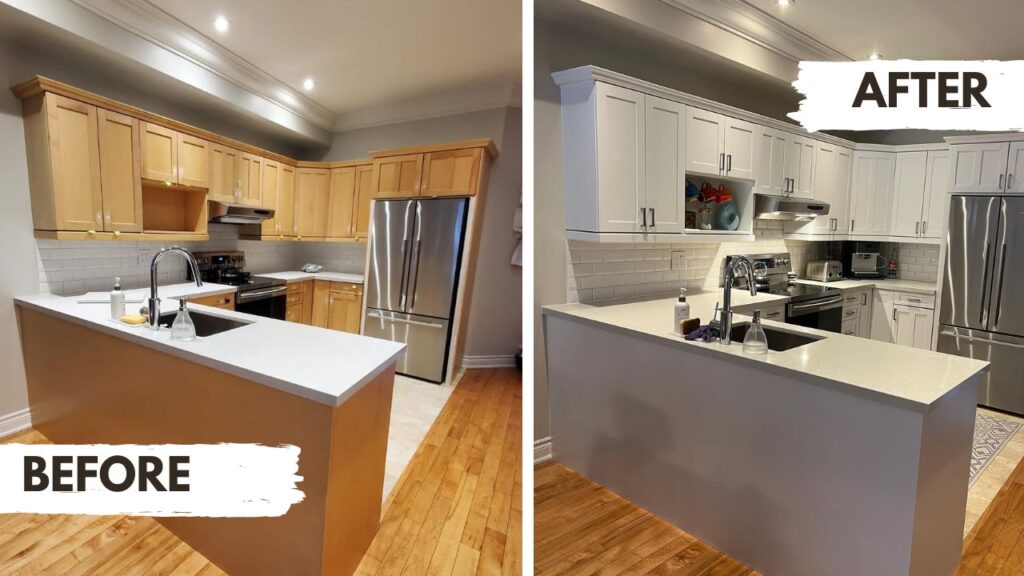
When you think of giving your kitchen a facelift, your first thought might be major renovations, new appliances, or even changing the countertops. However, painting the kitchen cabinets is one of the most transformative yet budget-friendly ways to revitalize the space. Cabinets, due to their prominence, have a significant impact on the overall aesthetics of the kitchen. A fresh coat of paint can breathe new life into them, instantly modernizing the space and reflecting your style.
But why specifically choose to paint your cabinets over other forms of upgrade? Firstly, it’s cost-effective. Instead of shelling out large sums for new cabinets, painting them can provide a refreshed look at a fraction of the cost. Secondly, the flexibility in colour choices allows for creativity and a unique touch. Whether you opt for a trendy muted olive, a classic white, or a bold navy, the options are endless and can be tailored to your tastes. Lastly, it’s environmentally friendly. By painting and repurposing your cabinets, you’re reducing waste and promoting sustainability.
This guide will explore the complete process, tips, and tricks of painting kitchen cabinets. Whether you’re a seasoned DIY enthusiast or someone looking for a weekend project, this guide will offer valuable insights to ensure your kitchen transformation is a resounding success.
Unlock the Perfect Finish with Professionals by Your Side!
Thinking of rejuvenating your kitchen cabinets? While the allure of a DIY project might be tempting, entrusting the task to seasoned professionals can make all the difference. Our expert team not only guarantees a flawless finish but also ensures the use of the best materials, tailored techniques, and state-of-the-art tools that most DIY kits don’t offer. Don’t risk uneven coats, drips, or missed spots. With us, you’ll save time, avoid common pitfalls, and achieve a durable, stunning result that will stand the test of time. Dive into a hassle-free experience and let your cabinets shine with the premium touch they deserve!
Get Your Easy Online Cabinet Painting Quote Today! Click Here
Understanding the Basics of Painting Kitchen Cabinets
When embarking on a kitchen transformation, understanding the basics is crucial. Before diving into the actual painting process, it’s essential to get acquainted with the different types of kitchen cabinets, weigh the benefits of painting versus replacing them, and familiarize oneself with the necessary tools and materials. This foundational knowledge ensures a smoother journey and a more successful outcome.
Types of Kitchen Cabinets You Can Paint: From Wood to Laminates
The material and build of your kitchen cabinets play a pivotal role in determining how you’ll approach the painting process. Let’s explore the common types:
- Solid Wood Cabinets: A classic choice, these cabinets are made entirely of natural wood. They are durable, long-lasting, and often come in various grain patterns and colours. Popular woods include oak, maple, cherry, and pine.
- Plywood Cabinets: These cabinets use layered wood veneer, providing strength and stability. Plywood cabinets resist warping and moisture better than some other materials.
- MDF (Medium Density Fiberboard) Cabinets: Made from wood fibers, wax, and resin, MDF offers a smooth surface ideal for painting. They’re less expensive than solid wood but can be sensitive to moisture.
- Laminates: These are made from plastic layers bonded to particleboard or MDF. They come in various colours and patterns but can be a bit challenging to paint because of their non-porous surface.
- Melamine: Like laminates, melamine is a plastic-based product applied to a core (like particleboard). They’re durable and moisture-resistant but require specific prep for painting.
Benefits of Painting Versus Replacing Kitchen Cabinets
Choosing to paint your cabinets can offer a slew of benefits over complete replacement:
- Cost-Effective: Painting is substantially less expensive than buying and installing new cabinets. For homeowners on a budget, it’s an attractive option.
- Time-Saving: Replacing cabinets can take weeks, especially if you’re ordering custom units. Painting, on the other hand, can be done over a weekend or a few days, depending on the kitchen’s size.
- Environmentally Friendly: Repurposing your existing cabinets reduces waste. Instead of discarding old units, you’re giving them a new lease on life.
- Flexibility in Design: Painting offers endless colour and finish options, allowing homeowners to get creative and tailor their kitchen to their unique preferences.
- Preservation: If your cabinets are of high-quality material or have sentimental value, painting preserves the integrity and history of the original units.
Kitchen Cabinet Painting Tools and Materials
Embarking on a cabinet painting project requires the right tools and materials. Here’s a basic list to get you started:
- Cleaning Supplies: Degreasing solution, scrubbing sponge, and clean cloths.
- Sandpaper: Various grits for smoothing surfaces.
- Tack Cloth: To wipe away any sanding residue.
- Painter’s Tape: For protecting walls and other areas from paint.
- Stain-Blocking Primer: Essential for preparing cabinets
- Paint: High-quality cabinet coating
- Brushes/Rollers/Spray Gun: For applying paint. Foam rollers are great for a smoother finish.
- Drop Cloths: To protect floors and countertops.
- Screwdriver: For removing hardware.
- Paint Tray: For holding and rolling paint.
- Protective Gear: Gloves, safety goggles, and masks.
Setting a Budget and Timeline for Your Cabinet Painting Project
Budgeting: Knowing how much you’re willing to spend on the project is essential. Consider the following:
- Paint Costs: Different brands and finishes can vary in price. Ensure you have enough paint for multiple coats if necessary.
- Tools & Materials: While some tools might be on hand, others may need purchasing or renting.
- Incidental Costs: Account for unexpected expenses, such as replacing worn-out brushes or buying additional cleaning supplies.
Timeline: Knowing the time you’ll invest can help set realistic expectations.
- Assessing the Size of the Project: The number of cabinets, drawers, and the size of your kitchen will determine the project’s length.
- Setting Milestones: Break down the project into manageable chunks. Allocate specific days for cleaning, sanding, priming, and painting.
- Buffer Time: Always add extra time for unforeseen delays, like paint not drying quickly due to humidity.
Choosing the Right Paint Colour and Finish for Your Kitchen Style
Colour Choices:
- Complementing Your Interiors: The new colour should complement the existing décor, countertops, and backsplash. Using colour swatches or sample paint can help visualize the final look.
- Mood and Atmosphere: Colours evoke emotions. Decide whether you want a warm, cozy feel (like with earthy tones) or a clean, modern vibe (with grays or whites).
- Trends vs. Timelessness: While trendy colours can refresh your kitchen, timeless shades ensure longevity in style.
Finish Options:
- Matte: Offers a non-reflective finish, hiding imperfections, but can be less wipeable.
- Semi-Gloss: Provides a subtle shine, is more durable, and easier to clean – ideal for high-traffic kitchens.
- Gloss: Delivers a high shine, is very durable, but can highlight imperfections.
Safety Precautions and Setting Up Your Cabinet Painting Workspace
Safety First:
- Ventilation: Ensure proper airflow to dissipate paint fumes. Open windows and use fans, if necessary.
- Protective Gear: Wear safety goggles, gloves, and a mask, especially if sanding or working with oil-based paints.
- Child and Pet Safety: Keep them away from the workspace and ensure they can’t access paint or tools.
Setting Up:
- Clearing the Space: Remove non-essential items from the kitchen. This not only creates space but also ensures that nothing gets accidentally stained.
- Drop Cloths: Cover countertops, appliances, and the floor to protect against paint splatters.
- Lighting: Adequate lighting is crucial. Use additional lamps if working in the evenings or if your kitchen is dimly lit.
- Organizing Tools & Materials: Keep everything within arm’s reach, organized neatly to facilitate easy access.
Preparation is more than just a prelude to the main event; it’s a critical project component. You’re setting yourself up for a successful kitchen transformation with the right budget, colour choices, and safety measures. In the next Section, we’ll dive deep into the nitty-gritty of preparing those cabinets for their makeover.
Cabinet Cleaning and Prepping
Before a brush meets your cabinet in earnest, preparation is a vital step that mustn’t be overlooked. Properly prepping your cabinets ensures that the paint adheres well, resulting in a smooth and lasting finish. This Section will detail the best practices for getting your cabinets in prime condition for painting.
Removing Hardware and Doors
Hardware Removal:
- Labeling: Before unscrewing any knobs, handles, or hinges, label each piece and its corresponding location. This will simplify reassembly.
- Tools: Typically, a simple screwdriver is all you need, but some modern fittings may require a hex key or other specialized tools.
- Storage: Place all removed hardware into a container to avoid losing any small pieces.
Door Removal:
- Technique: Start at the top of your cabinets and work your way down. While removing doors, it’s helpful to have a partner to support the door’s weight, especially for larger doors.
- Labeling: Mark the back of each door with its location using painter’s tape or a pencil. This will ensure each door returns to its proper place, which is crucial for older cabinets that might have warped slightly over time.
Cabinet Cleaning Solutions to Remove Grease and Grime
Years of cooking can leave behind a stubborn layer of grease and grime. Here’s how to tackle it:
- Dish Soap & Water: A simple mixture of warm water and dish soap can be surprisingly effective. The degreasing properties of dish soap break down kitchen grease.
- Trisodium Phosphate (TSP): This powerful cleaning agent works wonders on exceptionally grimy cabinets. Ensure you wear gloves and follow safety precautions.
- Vinegar Solution: If you’re looking for a more natural cleaner, mixing equal parts water and white vinegar can effectively break down grease.
- Baking Soda and water: Create a paste with baking soda and water for tough spots. Apply the paste, let it sit for a few minutes, then scrub gently with a brush.
- Rinsing: Regardless of the cleaning solution used, wiping down the cabinets with clean water afterward is vital to remove any residue.
Kitchen Cabinet Sanding Basics: Tips and Techniques
Sanding is essential for paint adherence, especially for glossy surfaces.
- Choose the Right Grit: Start with medium-grit sandpaper (120-150 grit) for initial sanding. If the cabinet surface is exceptionally rough, you might need a coarser grit initially.
- Direction Matters: Always sand in the direction of the wood grain to prevent scratches.
- Even Pressure: Apply consistent pressure as you sand, ensuring you cover the entire surface.
- No Skipping: Even if your cabinets look clean and smooth, don’t skip sanding. The slight roughness sanding provides helps the paint adhere better.
- Dust Removal: After sanding, thoroughly wipe down surfaces with a tack cloth to remove any dust, as leftover particles can interfere with painting.
With your cabinets cleaned, sanded, and primed for painting, you’re well on your way to a kitchen transformation. While the preparation might seem tedious, the time invested ensures that your painting process is seamless and your results professional.
Kitchen Cabinet Primer Application
Before the vibrant hues or subtle tones grace your cabinets, the primer is an unsung hero in the painting process. This Section will delve into why priming is crucial, guide you in selecting the perfect primer for your material, and share techniques for a flawless application.
Importance of Priming Kitchen Cabinets
Adhesion: One of the main roles of a primer is to provide a surface to which paint can adhere effectively. Without it, paint might peel, chip, or wear out prematurely.
Consistency and Colour Accuracy: Primers ensure that the paint’s colour appears as intended. It provides a neutral base, preventing the cabinet’s original colour or wood grain from showing through.
Protection: Primers seal the wood, preventing moisture absorption, which can lead to warping or mold growth.
Smooth Finish: A primer helps fill minor imperfections, ensuring that your paint glides on smoothly for a flawless finish.
Choosing the Right Primer for Your Cabinet Material (BIN)
BIN Primer: BIN is a shellac-based primer known for its exceptional adhesion properties and stain-blocking capabilities. It’s particularly effective for challenging surfaces.
- Wood Cabinets: BIN primers are ideal for solid wood cabinets. They seal the wood, preventing tannin (natural oils in the wood) from bleeding through and discolouring the paint.
- Laminates & Melamine: These surfaces are notoriously tricky to paint due to their non-porous nature. BIN primers offer excellent adhesion, making them a top choice.
- Previously Painted Cabinets: If your cabinets have been painted in the past, especially with a glossy finish, a BIN primer will ensure that the new paint adheres properly.
Primer Application
Brush, Roller, and Spraying Techniques for a Smooth Application
Proper Cleaning: Even if you’ve cleaned your cabinets before sanding, give them a quick wipe-down to ensure no dust or debris interferes with the primer.
Brush:
- Selection: Use a high-quality synthetic brush for water-based primers and a natural bristle brush for oil-based primers.
- Technique: Dip only one-third of the bristle length into the primer. Use long, even strokes, and avoid overloading the brush to prevent drips.
Roller:
- Selection: A foam roller is ideal for a smooth finish on flat cabinet surfaces.
- Technique: Ensure even loading of the roller and apply using a W or M pattern, then fill in the gaps with vertical strokes for uniform coverage.
Spraying:
- Selection: Use a high-volume, low-pressure (HVLP) sprayer for precision and less overspray.
- Technique: Hold the spray gun perpendicular to the surface, approximately 6-12 inches away. Use consistent, overlapping strokes, moving the sprayer at a steady pace. Remember to mask off areas you don’t want to spray, and always work in a well-ventilated space.
- Advantages: Spraying can offer the smoothest possible finish, especially on complex cabinet designs or intricate moldings where a brush or roller might not reach as effectively.
Thin Coats: Regardless of the application method, applying two thin coats of primer rather than one thick coat is better. This approach ensures even coverage and quicker drying times.
Sand Between Coats: After drying your first primer coat, lightly sand the surface with fine-grit sandpaper (220 grit or higher) to ensure maximum smoothness. Wipe away any dust before applying the second coat.
Drying Time: Allow adequate drying time as per the primer’s instructions before painting. Rushing this step can result in the paint not adhering properly.
The application method you choose can significantly impact your cabinets’ final look and feel. Whether you’re using a brush, roller, or sprayer, mastering the technique ensures your primer lays the perfect foundation for your paint.
Kitchen Cabinet Paint Application
After priming, the next exhilarating step is the paint application. It’s where your cabinets begin to transform, taking on the shade and finish you’ve chosen. But for a striking and enduring result, it’s essential to understand the tools at your disposal and the techniques to use them correctly.
Brush vs. Roller vs. Spray: Pros and Cons
Brush:
- Pros: Precise control for detailed areas, affordable, easy cleanup, and great for touch-ups.
- Cons: Slower application, potential for visible brush strokes, and may not be ideal for larger surfaces.
Roller:
- Pros: Faster than a brush, smooth finish on flat surfaces, minimal equipment required.
- Cons: Can’t access intricate designs or moldings, potential for stipple effect if not used correctly.
Spray:
- Pros: Fastest application, smoothest possible finish, ideal for intricate designs or large batches of doors.
- Cons: Requires more preparation (masking off areas), needs a well-ventilated space, potential overspray, and cleanup can be extensive.
Techniques for Avoiding Cabinet Paint Drips and Streaks
Brush:
- Loading: Dip only one-third of the bristle length into the paint and tap off excess on the can’s side.
- Stroke: Use long, even strokes and maintain a wet edge to prevent lap marks.
Roller:
- Loading: Roll it back and forth in the paint tray until it’s uniformly coated but not dripping.
- Application: Use a W or M pattern for initial application and vertical strokes for even distribution.
Spray:
- Distance: Hold the gun 6-12 inches from the surface and maintain a consistent distance.
- Overlap: Each pass should overlap the previous one by about 50% to ensure even coverage without buildup.
Multiple Cabinet Paint Coat Applications for Lasting Durability
First Coat:
- This is your foundation. Ensure complete and even coverage, but don’t lay it on too thick. Remember, thin and consistent is the key.
Sanding Between Coats:
- Once the first coat is dry, lightly sand with a fine-grit sandpaper (220 or higher) to achieve an even smoother finish for the next layer. This also promotes better adhesion.
Subsequent Coats:
- Depending on the colour you’ve chosen and the original cabinet colour, you might need two or more coats for complete coverage and desired depth of colour. Each coat should be applied as thin and evenly as the first.
Final Coat:
- Your last coat should be applied with extra care, ensuring a streak-free and smooth finish. After it’s dry, inspect the cabinets in various lighting conditions to check for missed spots or imperfections.
Paint application is both an art and a science. The tools you choose, combined with the techniques you employ, will determine the beauty and longevity of your kitchen cabinets. With patience and attention to detail, you’ll be rewarded with a brand-new kitchen.
Finishing Cabinet Touches
The paint has dried, and the vibrant new colour of your cabinets beckons. Yet, the process isn’t complete without those crucial final steps. This Section guides you through the reinstallation of hardware and doors and provides tips to keep your cabinets pristine for years to come.
Reinstalling Hardware and Doors
Preparation:
- Check Dryness: Ensure the paint on the cabinets and doors is completely dry. This might take longer than the “to touch” time indicated on the paint can, especially in more humid conditions.
Hardware:
- Cleaning: If you’re reusing the original hardware, ensure it’s clean and free of old paint or grime. If it looks dated or tarnished, consider updating it with new pieces that match your cabinet’s fresh look.
- Installation: Use a screwdriver or drill to reinstall the hardware, being careful not to over-tighten and damage the fresh paint.
Doors:
- Alignment: Reattach doors, ensuring they align correctly. You might need to make minor tweaks for adjustable hinges to get the perfect fit.
- Soft Close: If your cabinets didn’t originally have soft-close hinges, consider upgrading to them now. They reduce wear and tear and provide a high-end feel to your kitchen.
Keeping Your Painted Cabinets Looking Fresh and New
Regular Cleaning:
- Mild Detergent: Use a soft cloth and a solution of mild dish soap and water to wipe away splatters and spills. Avoid abrasive cleaners or pads that can damage the paint.
Avoid Excessive Moisture:
- Water is the paint’s enemy. Ensure areas around the sink, dishwasher, and stovetop are well-sealed and persistent moisture-free.
Touch-Ups:
- Keep some of your cabinet paint in a small container for touch-ups. Over time, inevitable nicks or scratches may appear. A quick touch-up can make them disappear.
Protection:
- Felt Pads: Attach felt pads to the inside corners of doors and drawers. This prevents them from chipping when they’re closed forcefully.
- Paint Hardener: Depending on your paint, you might consider adding a hardener for added protection.
Annual Inspection:
- Once a year, inspect your cabinets closely. Tighten any loose hardware, check for areas needing a touch-up, and address any issues before they become larger problems.
Your newly painted cabinets are more than just a design upgrade; they’re an investment in your home’s aesthetic. With careful finishing touches and regular maintenance, they will remain a centerpiece of your kitchen for years to come.
Troubleshooting Common Cabinet Painting Problems
While painting kitchen cabinets can drastically improve their look, the process might not always go perfectly. However, many common issues can be fixed with the right techniques. This Section will guide you through addressing and preventing some typical painting problems.
Addressing Paint Bubbles and Peeling
Causes:
- Moisture: Paint can bubble if the surface wasn’t dry when it was painted.
- Lack of Primer: Without a proper primer, paint can fail to adhere correctly and may peel or bubble.
Solutions:
- For Bubbles: Pop the bubble with a pin, then carefully flatten the paint with a scraper. Lightly sand the area, prime, and then repaint.
- For Peeling: Remove the peeling paint using a scraper or sandpaper. Clean the surface, apply primer, and then repaint.
Prevention:
- Always ensure surfaces are clean, dry, and primed before painting.
Fixing Uneven Paint Applications
Causes:
- Overloading: Applying too much paint at once can lead to drips or uneven patches.
- Rushing: Hurrying through the job without allowing proper drying times can result in unevenness.
Solutions:
- For Drips: Sand the area where the drip is, then apply a thin coat of paint over it.
- For Unevenness: Lightly sand the entire surface and apply a new thin coat of paint.
Prevention:
- Use even strokes, whether brushing, rolling, or spraying. Always adhere to recommended drying times.
Repairing Chips and Scratches
Causes:
- Everyday wear and tear, especially in high-traffic areas of the kitchen.
Solutions:
- For Minor Scratches: Use a small brush to touch up the scratch with matching paint carefully.
- For Chips: Clean the chipped area, apply a tiny amount of wood filler if needed, sand smooth once dry, and then touch up with paint.
Prevention:
- Consider applying a sealant for added protection. Regularly inspect and address minor damages before they worsen.
No painting project is immune to issues, but with careful troubleshooting, you can ensure your kitchen cabinets look their best. Always remember proper preparation is the key to preventing most common painting problems.
Painted Kitchen Cabinet Maintenance and Upkeep
A fresh paint job can completely revitalize your kitchen cabinets. But to keep them looking their best, regular maintenance and careful upkeep are essential. In this Section, you’ll learn how to clean, touch up, and prolong the life of your painted cabinets, ensuring they remain a highlight of your home for years to come.
Cleaning Painted Cabinets Without Damaging the Painted Finish
Materials:
- Soft Cloth: Avoid abrasive materials that might scratch the paint.
- Mild Detergent: Gentle soap diluted in water works best. Avoid strong chemicals or bleach.
Method:
- Dampen the cloth with the soapy water.
- Gently wipe down the cabinets, focusing on areas with spills or splatters.
- Wipe the cabinets again with a cloth dampened with clean water to remove any soap residue.
- Dry the cabinets with a soft towel to avoid moisture damage.
Tips:
- Clean up spills and splatters promptly to prevent them from setting.
- Avoid excessive water, which can seep into seams and damage the wood.
When to Touch Up or Repaint Your Cabinets
Touching Up:
- Small scratches, chips, or minor imperfections are ideal for touch-ups. Keep leftover paint and a small brush on hand for this purpose.
Repainting:
- Consider a full repaint when:
- The colour has faded significantly.
- There are extensive chips, scratches, or areas where the paint is peeling.
- You wish to change the colour for a new look.
Maximizing the Lifespan of Your Kitchen Cabinet Paint Job
Regular Inspection:
- Periodically check your cabinets for signs of wear or damage. Addressing small issues early can prevent more significant problems later.
Use Protective Measures:
- Add bumper pads to doors to prevent chipping from forceful closures.
- Consider using a protective hardener in the paint to resist wear and moisture.
Environmental Considerations:
- Ensure good ventilation in the kitchen to prevent excessive moisture, which can harm both the wood and the paint.
Stay Informed:
- Paint technologies and products evolve. Stay updated with the latest products that can offer better protection and finish.
Your painted cabinets are not just functional storage; they visually represent your home’s style and your personal taste. With consistent maintenance and smart upkeep, you can ensure they remain in tip-top shape, serving both their practical function and aesthetic appeal for many years.
Inspirational Cabinet Ideas
Your kitchen cabinets offer an expansive canvas for creativity. While the primary goal might be rejuvenation or maintenance, don’t hesitate to make a statement. This Section sheds light on colour trends, patterns, and the undeniable value of a modernized kitchen.
Cabinet Colour Combinations to Inspire
Warm and Inviting:
- Earthy tones, like terracotta and creamy whites or beiges, create a welcoming ambiance.
Cool and Contemporary:
- Charcoal gray paired with icy blues or mint greens offers a sleek, modern feel.
Bold and Beautiful:
- Don’t be afraid to go bold with colours like deep red, emerald green, or even mustard yellow. Just ensure they complement the overall colour palette of your kitchen.
Two-Tone Cabinets:
- Painting upper and lower cabinets in different shades or colours can create a dynamic look. For instance, dark hues below with lighter shades above can give the illusion of a higher ceiling.
Statement Handles and Knobs:
- While not a paint design, incorporating unique hardware can significantly enhance the overall appearance of your painted cabinets.
Your kitchen is the heart of your home, and your cabinets are a major part of that heart. By tapping into current trends and adding your unique touch, you can transform them into pieces of art that serve a dual purpose: functionality and style.
Unlock the Perfect Finish with Professionals by Your Side!
Thinking of rejuvenating your kitchen cabinets? While the allure of a DIY project might be tempting, entrusting the task to seasoned professionals can make all the difference. Our expert team not only guarantees a flawless finish but also ensures the use of the best materials, tailored techniques, and state-of-the-art tools that most DIY kits don’t offer. Don’t risk uneven coats, drips, or missed spots. With us, you’ll save time, avoid common pitfalls, and achieve a durable, stunning result that will stand the test of time. Dive into a hassle-free experience and let your cabinets shine with the premium touch they deserve!
Get Your Easy Online Cabinet Painting Quote Today! Click Here
Embracing the Fresh, New Look of Your Kitchen Cabinets
Stepping back and gazing at your freshly painted cabinets, it’s hard not to feel a surge of accomplishment. The kitchen, once perhaps faded or outdated, now radiates renewed vitality. Though rooted in the cabinets, the transformation extends its influence to every corner of the room, making the entire space feel rejuvenated.
Painting your kitchen cabinets isn’t merely about changing a colour. It’s about infusing new life into a space where memories are made, family meals are shared, and laughter echoes. This fresh coat of paint symbolizes more than just an aesthetic upgrade; it signifies the evolution of your home and the care you invest in ensuring it reflects your tastes and evolving needs.
As you embrace this new look, consider the joy of future moments in this refreshed space. Picture the morning sunlight catching the gleam of the freshly painted surfaces, the evening dinners under ambient lighting reflecting softly off the smooth finishes, and the countless compliments from visitors who marvel at your kitchen’s transformation.